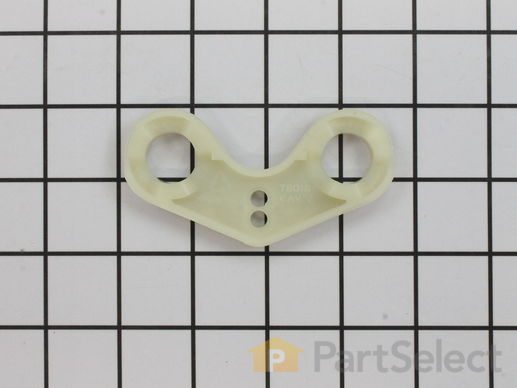
Part Location Diagram of 61003647 Whirlpool Natural Door Closer
See part 12 in the diagram
Replacing your Maytag Refrigerator Natural Door Closer
( Grid squares measure 1x1 inch )
Customer Service Representative

Get in touch, we're here to help!

Monday to Saturday
8am - 9pm EST

customerservice@partselect.ca

Natural Door Closer

★★★★★
★★★★★
1 Review
$22.99
  In Stock

Get this part fast! Average delivery time for in-stock parts via standard shipping: 1.8 days.

PartSelect Number PS2059251
Manufacturer Part Number 61003647
Manufactured by Whirlpool
Product Description

Natural Door Closer Specifications

This part is the replacement natural door closer for your refrigerator. It is black in color and is approximately 3 inches by 2 inches in size. The natural door closer allows your refrigerator door to open and close smoothly. If your door won’t open or close, the door is sweating, or the refrigerator is too warm, it could be an indication that you need to replace the door closer. You will also want to replace the door closer if it is cracked, broken, or missing. This part is sold individually and is an OEM part sourced directly from the manufacturer.
How Buying OEM Parts Can Save You Time and Money

How Buying OEM Parts Can Save You Time and Money

Part Videos

Replacing your Maytag Refrigerator Natural Door Closer

Replacing your Maytag Refrigerator Natural Door Closer
Troubleshooting
This part fixes the following symptoms:
Door won’t open or close | Door Sweating | Fridge too warm
This part works with the following products:
Refrigerator.
This part works with the following products:
Maytag, Jenn-Air, Crosley, Admiral.
Part# 61003647 replaces these:
AP4068298, 665516, 61003175, 61003176, 61003528, 61003647
Back to Top
Customer Reviews
Average Rating:
★★★★★
★★★★★
1 Review
5.0
Filter By Rating:
  • 5 Stars
    1
  • 4 Stars
    0
  • 3 Stars
    0
  • 2 Stars
    0
  • 1 Star
    0
  • 1
Sort by:
Sorry, we couldn't find any existing reviews that matched. Try using some different or simpler keywords.
  • 1
Customer Repair Stories
 Average Repair Rating: 3.8 / 5.0, 21 reviews. What's this?
  • 1
  • 2
  • 3
Sort by:
Sorry, we couldn't find any existing installation instruction that matched.
The food side of my Maytag wide by side refrigerator was 80 degrees.
Okay all you ladies out there, listen up. Yep, I am a girl and had never worked on a refrigerator before. I googled the model of frig and the problem. Finding that one of two things were probably wrong, I went to parts select and ordered both parts. Two days later they arrived. I replaced the coil and thermostat and waited one day -- the food side still did not cool down. I replaced the frost board and immediately the unit started to cool. I had called a repairman on Saturday and was told that they couldn't make an appointment until the following Friday because of a tremendous work load. I had the refrigerator running by Thursday, the day before anyone could even take a look at my refrigerator. Even though I spent $30 on a part I didn't need, I saved a bundle, the house call would of been more than $30.
Other Parts Used:
Water Filter Defrost Heater and Thermostat Assembly Adaptive Defrost Board Door Closer with Cup Door Closer with Cup Lower Hinge Pin
  • Eva from Macomb, IL
  • Difficulty Level:
    Easy
  • Total Repair Time:
    1- 2 hours
  • Tools:
    Nutdriver, Screw drivers
139 of 155 people found this instruction helpful.
Was this instruction helpful to you?
Thank you for voting!
Lower hinge (door closer) was worn out, so door wouldn't close on its own.
Simple. Removed all food and shelves from the door. Removed the top hinge, which allowed me to lift the door off the door closer. I layed it on the kitchen table on its front with the handle over the edge so it wouldn't cause a problem. Since I had it all apart I replaced both the top and bottom pieces of the door closer, and put a touch of grease on it. I then reassembled it in the reverse order. - The fountain spring and actuator pad were for a different problem with the fountain. It wouldn't shut off all the time because the actuator pad was getting stiff from time and use. I removed A/C power and turned off the water, then removed the front screws from the fountain cover. I then had easy access to the actuator pad, which only took a few minutes to replace. Careful when you pull the cover off, there are wires connected to it. Just don't forget to pull the plug out off the wall so you don't get killed!
Other Parts Used:
Actuator Pad Ice Chute Door Return Spring Lower Hinge Pin
  • Matt from Green Bay, WI
  • Difficulty Level:
    Really Easy
  • Total Repair Time:
    15 - 30 mins
  • Tools:
    Nutdriver, Screw drivers, Socket set
19 of 23 people found this instruction helpful.
Was this instruction helpful to you?
Thank you for voting!
Door closer on refrigerator side was worn out
This was a very simpler repair to an annoying problem. First I removed the decorative cover on the top hinge pin of the door which was held on with one screw. I then removed the 3 screws of the top hinge pin with a socket, held the door in place with my hand and took off the top pin. Next, I simply lifted the refrigerator door off the bottom worn out hinge.
removed the old door hinge bracket and bottom lower hinge pin that had worn, placed the new bottom hinge pin in the bracket. Finally, on the bottom of the refrigerator I replaced the natural door closer held on by one screw. Lifted the door back onto the new bottom hinge pin, held the door in place and installed the top hinge pin, put the cover back on and the refrigerator is closing like it was new again.
Other Parts Used:
Lower Hinge Pin Lower Door Hinge Bracket - white
  • Robert from Londonderry, NH
  • Difficulty Level:
    Really Easy
  • Total Repair Time:
    Less than 15 mins
  • Tools:
    Screw drivers, Socket set
10 of 12 people found this instruction helpful.
Was this instruction helpful to you?
Thank you for voting!
door was not shutting and sealing
took off door and replaced parts and replaced door
Other Parts Used:
Door Closer with Cup Lower Hinge Pin
  • james from street, MD
  • Difficulty Level:
    Easy
  • Total Repair Time:
    15 - 30 mins
  • Tools:
    Screw drivers
7 of 10 people found this instruction helpful.
Was this instruction helpful to you?
Thank you for voting!
Door wouldn't close properly.
Removed top hinge cover. With nut driver, removed the three screws that held top hinge. Gently lifted door off bottom hinge and laid door across sawhorses. Once I saw what parts were worn on bottom hinge, removed them. Was a little confused from parts diagram online to what I had in my hand and needed to put back on door. After a few minutes realized I had ordered basically a duplicate part, "closer with cup", didn't need it. With a screw driver easily replaced new parts and reassembled the door. Works great.
Other Parts Used:
Door Closer with Cup Lower Hinge Pin Lower Hinge
  • JASON from Idledale, CO
  • Difficulty Level:
    Really Easy
  • Total Repair Time:
    30 - 60 mins
  • Tools:
    Nutdriver, Screw drivers
6 of 7 people found this instruction helpful.
Was this instruction helpful to you?
Thank you for voting!
Door will not close automatically
This is an easy repair. It took me longer to remove the bins off the inside of the door and clean then up, then the actual repair. Remove the top hinge trim 1 Phillips screw. After the hinge trim is removed you'll see 3 hex screws. Remove the 3 screws. Hold and open the door half way, and lift up on the door. The door is not heavy. Use your kitchen table as a work bench. Place the door flat on the kitchen table . On the bottom of the door you'll see the "CLOSER" One screw removes it. Reverse operations and reassemble. Note: Put a little Vaseline grease on the pivot point. Thats it ... 15 minutes and your done plus you saved a $65.00 service call.
Other Parts Used:
  • Joseph from Wallingford, CT
  • Difficulty Level:
    Really Easy
  • Total Repair Time:
    Less than 15 mins
  • Tools:
    Nutdriver
4 of 4 people found this instruction helpful.
Was this instruction helpful to you?
Thank you for voting!
Door did not close by self the last 1/4 inch.
First I removed the top hinge cover plate. Then removed the three screws in the top hinge. I lifted the door off the lower hinge and laid the door on the kitchen counter. I removed the one screw holding the natural door closer part from the bottom of the door and installed the new part with the same screw. I then replaced the lower hinge pin with the new one. It just sets in place. I then repositioned the door and reinstalled the top hinge. the whole job took about 15 minutes after the refrig door had been emptied. The door works like new.
Other Parts Used:
Lower Hinge Pin
  • Robert from Virginia Beach, VA
  • Difficulty Level:
    Really Easy
  • Total Repair Time:
    15 - 30 mins
  • Tools:
    Nutdriver
4 of 4 people found this instruction helpful.
Was this instruction helpful to you?
Thank you for voting!
The refrigerator door would not close on its own and needed to be pushed
First we removed screws in the top hinge, then lifted the door up and off the bottom hinge. Replacement of the door closer and lower hinge pin took less than a couple of minutes. Then putting the door back on and screwing the top back on was nothing.

We additionally replaced the puriclean filter which simply was twisting it off and then the new one back on
Other Parts Used:
Water Filter Lower Hinge Pin SCREW
  • Catherine from Vernon Hills, IL
  • Difficulty Level:
    Really Easy
  • Total Repair Time:
    15 - 30 mins
  • Tools:
    Screw drivers, Socket set
3 of 3 people found this instruction helpful.
Was this instruction helpful to you?
Thank you for voting!
Freezer door would not close by itself
Removed the hinge cover on top and the 3 screws. Disconnected the electrical connection.
Lifted the door up from lower hinge and laid the down down on the floor. Carefully because there is a water line coming up through the lower hinge cup.
There is a Paraflex water connector so you can disconnect the water line and feed the line up through the cup. Having never seen one, i called, googled, etc. to find out how the connector was to come apart.
No one knew. No one!
I put the door back together and called Maytag only to find out that they do not provide technical service on any of their parts.
I was telling a friend of mine, who is an engineer,
about the dilemma. He came over and said it was a push-pull connector and he took it apart.
After that, I put the new parts in and put the door back on, Replaced the lower plastic hinge cover.
(Open the door first)
After swearing I would never buy another Maytag product, I fixed myself a drink (It was after 6:00 pm)
and relaxed.
Other Parts Used:
Door Closer with Cup
  • John from Tucson, AZ
  • Difficulty Level:
    Difficult
  • Total Repair Time:
    1- 2 hours
  • Tools:
    Pliers, Screw drivers
2 of 2 people found this instruction helpful.
Was this instruction helpful to you?
Thank you for voting!
Door would not close all the way - cold air leaked and condensation & ice formed in fridge.
After taking advice from the other posts, I removed all contents from the door, removed the screws from the top hinge and then lifted the door off the bottom hinge pin.

While door was lying flat I unscrewed the old natural closer, replaced it with the new one. Swapped out the old lower hinge pin with the new one.

I then had someone help me lift the door back on the hinge pin and fastened the top hinge screws while they held the door in place.

It worked perfectly and was very easy.
Other Parts Used:
Lower Hinge Pin
  • jennifer from ann arbor, MI
  • Difficulty Level:
    Really Easy
  • Total Repair Time:
    15 - 30 mins
  • Tools:
    Socket set
2 of 2 people found this instruction helpful.
Was this instruction helpful to you?
Thank you for voting!
  • 1
  • 2
  • 3
Questions and Answers

We're sorry, but our Q&A experts are temporarily unavailable.
Please check back later if you still haven't found the answer you need.

Related Parts
Model Cross Reference
This part works with the following models:
PartSelect Number: PS2059251
Manufacturer Part Number: 61003647
Brand
Model Number
Description
Admiral
ASD2120DRQ
Refrigerator - Side-by-side
Admiral
ASD2120DRW
Refrigerator - Side-by-side
Admiral
ASD2123DRA
Refrigerator - Side-by-side
Admiral
ASD2123DRQ
Refrigerator - Side-by-side
Admiral
ASD2123DRW
Refrigerator - Side-by-side
Admiral
ASD2514ARQ
Refrigerator - Side-by-side
Admiral
ASD2514ARW
Refrigerator - Side-by-side
Crosley
CS21A2W
Refrigerator - Side-by-side
Crosley
CS21A5DW
Refrigerator - Side-by-side
Crosley
CS21B5DA
Refrigerator - Side-by-side
Crosley
CS21B5DQ
Refrigerator - Side-by-side
Crosley
CS21B5DW
Refrigerator - Side-by-side
Crosley
CS21F2Q
Refrigerator - Side-by-side
Crosley
CS21F2W
Refrigerator - Side-by-side
Crosley
CS21F5DW
Refrigerator - Side-by-side
Crosley
CS21G2Q
Refrigerator - Side-by-side
Crosley
CS21G2W
Refrigerator - Side-by-side
Crosley
CS21G5DQ
Refrigerator - Side-by-side
Crosley
CS21G5DW
Refrigerator - Side-by-side
Crosley
CS23A6DW
Refrigerator - Side-by-side
Crosley
CS23B5A
Refrigerator - Side-by-side
Crosley
CS23B5W
Refrigerator - Side-by-side
Crosley
CS23B6DA
Refrigerator - Side-by-side
Crosley
CS23B6DQ
Refrigerator - Side-by-side
Crosley
CS23B6DW
Refrigerator - Side-by-side
Crosley
CS23G5Q
Refrigerator - Side-by-side
Crosley
CS23G5W
Refrigerator - Side-by-side
Crosley
CS24G6DB
Refrigerator - Side-by-side
Crosley
CS24G6DQ
Refrigerator - Side-by-side
Crosley
CS24G6DW
Refrigerator - Side-by-side
Customer Service Representative

Get in touch, we're here to help!

Monday to Saturday
8am - 9pm EST

Contact Customer Service