Keep searches simple. Use keywords, e.g. "leaking", "pump", "broken" or "fit".
Sorry, we couldn't find any existing reviews that matched. Try using some different or simpler keywords.
★★★★★
★★★★★
Rock L - December 22, 2020
Verified Purchase
Did the job!!
After changing many, many, many heat fuses, I tried something else. Changing the Thermistor. My problem was solved.
< Prev
1
Next >
Customer Repair Stories
Average Repair Rating: 2.7 / 5.0, 7 reviews.
What's this?
< Prev
1
Next >
Sort by:
Search filter:
Clear Filter
Your search term must have 3 or more characters.
Keep searches simple. Use keywords, e.g. "leaking", "pump", "broken" or "fit".
Sorry, we couldn't find any existing installation instruction that matched.
Dryer not heating
I followed video instruction in disassembling and set screws from each section into diferent small bowls in the order they were removed. Hardest part was some of the screws were really hard to get loose without stripping them and my control panel did not match video but I figured it out. Replacing the parts were easy and putting it back together. While it was apart I cleaned everything including fan blower wheel. Thanks for the right parts and your online video. With your help and a prayer this 62 year old woman fixed the problem and dryer runs like new.
The customer support received from the this site individual. Was professional and very helpful. The video they recommended want me to the replacement part (Thermistor Ntc) step-by-step thanks to this site I had no problem at all
Unplugged dryer, pled forward to get access to back of dryer. Removed screws, enabling top, front control clip. door panel to be taken off. Lift out drum, replace heater assembly. drum belt, thermistor. Cleaned entire interior and reassembled, working good as new. All parts fit and were a exact match.
I'm not for reading instructions. So I just dove right in and took the dryer apart to get down to the motor. I gave the dryer a thorough cleaning and replaced the 3 parts I ordered from the online recommendation. Wish I would have ordered 2 sensors and the 2 thermostats that are near the burner. Just so replace beings I was in there. Replacing the parts was easy, found them just by looking for matches to the new parts. Reassembled the dryer, dont think I put a single screw back where I got it lol. And still haven't put the top lid back on due to difficulty. Not sure if I even needed any parts, found a nest in my outside vent completely plugging it. But after a good cleaning and replacing the parts the dryer dries the best it has since we've owned it. The dryer came with our house which we bought 3 years ago and it was 2 years old when we purchased the house, so it is now 5 years old.
Followed the instruction on video.was great after three parts now is OK .we have heat.still cheaper than having it service.
Other Parts Used:
Sal from MORENO VALLEY, CA
Difficulty Level:
Really Easy
Total Repair Time:
30 - 60 mins
Tools:
Screw drivers, Wrench (Adjustable)
3 of 4 peoplefound this instruction helpful.
Was this instruction helpful to you?
Thank you for voting!
Dryer was running, but, not heating.
My cleaning lady brought her handy husband over Saturday to help me. The only tool we used was a Phillips-head screwdriver. I went online earlier in the week and found a good video put out by Repair Clinic and another one I found on You-tube on how to disassemble the dryer. After watching several times, I knew I could do it. We worked together, I cut my hand on the inside edge of the control panel, but, when I hit a snag, we watched that part of the video again and worked right through. Replaced the Thermistor, NTC first, not a problem. Then the Heater Assembly, not too difficult. I couldn't find where one of the remaining parts went, so, we reassembled the dryer and gave it a try. Worked like a charm. We did remove a lot of lint from inside the cabinet and around the felt liner on either end of the drum. It works like it did when it was brand new. Highly recommend to work with someone, so, you don't get frustrated. I am 65 years old and this was a no brainer for me, although I am somewhat mechanically inclined. Very empowering to accomplish this repair. Just follow the video.
To install the repair part took about 5 minutes. It took a couple hours to take apart of put back together. Unfortunately the part I replaced was not the problem. I still have no heat. My own fault for not testing the parts before ordering. It seems there is no ignition of the gas for the hot air flow. I would be grateful for any suggestions. The video was FABULOUS...really step by step, screw by screw. Thanks for that. Barb Swenson
Other Parts Used:
Barbara from CUDAHY, WI
Difficulty Level:
Really Easy
Total Repair Time:
30 - 60 mins
Tools:
Screw drivers
1 of 2 peoplefound this instruction helpful.
Was this instruction helpful to you?
Thank you for voting!
< Prev
1
Next >
Questions and Answers
Ask our experts a question about this part and we'll get back to you as soon as possible!
19 questions answered by our experts.
< Prev
1
2
Next >
Sort by:
Search filter:
Clear Filter
Your search term must have 3 or more characters.
Keep searches simple. Use keywords, e.g. "leaking", "pump", "broken" or "fit".
Sorry, we couldn't find any existing answers that matched.Try using some different or simpler keywords, or submit your new question by using the "Ask a Question" button above!
Denette
January 3, 2018
Hello, my previous question was not answered. I guess i should have noted that I’m an electrician and test components every day. I do not need a video showing how to test for continuity. I need to know if all three thermal fuses are normally closed? My thermistor is reading 13.6k ohms at room temperature and the thermostat is closed (0.0 ohms). The high temp thermostat cut out fuse is blown and I know I need to replace it, I’m only trying to determine if the thermostat or the thermistor are bad as well causing the poor heat supply prior to the blown fuse. Should the thermostat have any resistance at room temperature or is it merely and on/off switch? And what should the thermisters resistance be at room temperature? Thank you for your help!
For model number DLE0442W
Hi Denette, Thank you for contacting us back. The high limit thermostat on this unit would open at 257 degrees and close at 221, So at room temperature it should be closed.For the Thermistor 10K ohms at room temperature at 70 degrees the resistance should be 9.3K ohms, 90 degrees would be 7.7K ohms, 100 degrees should be be 6.2K ohms, 120 degrees 4.3K ohms. The Second thermostat fuse should read closed or 5 ohms or less at room temperature. Hope this helps!
28 people found this helpful.
Was this helpful?
Thank you for voting!
Billie
January 20, 2018
Will this make your dryer not power on?
For model number DLE2301R
Hello Billie,
Thanks for your question. If your dryer is not powering up, you may want to test the motor, along with the thermal fuse and the belt. Test the electrical components with a multimeter to check for continuity, and replace any part that does not show continuity.
I hope this helps.
What should the resistance be at 70 degrees on the thermistor? Should the high temp cut out (thermostat) be open at room temperature (part # f130)? I’m trying to determine what component is bad? I have had poor heat for awhile and now no heat at all. I pulled it all apart and had a lot of lint on the heating element and the rear thermal cut out (f140) is closed while the f130 part number is open. Is it blown?
For model number DLE0442W
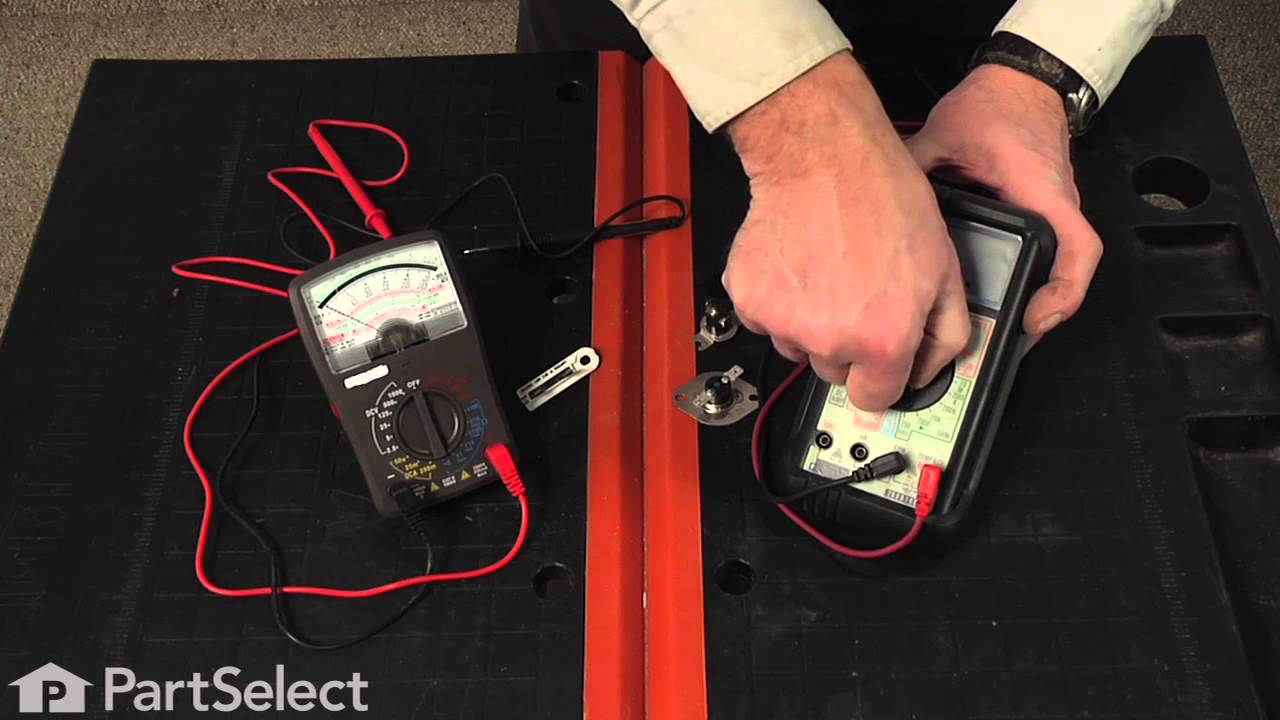
Hello, Thank you for your inquiry. I have included a link to a video on how to test the thermal fuse and thermostat with a multimeter. Hope this helps!
https://www.youtube.com/watch?v=JvI84Qa8Jc4
11 people found this helpful.
Was this helpful?
Thank you for voting!
Noreen
December 6, 2018
We have an LG gas dryer, i had a technician come and look at it today because it won't heat up. He told me that it was the control panel and they no longer manufacture it so the dryer was unfixable. Could it possibly be something else? It still tumbles and gets slightly warm.
For model number DLG7188RM
Hi Noreen, thank you for your question. When you are experiencing an issue like this there are a few parts that you will have to test to determine what is causing your issue. For all of these parts you can test them with a multi meter. First you will have to test your thermostats and thermal fuses to make sure they are all functioning correctly. After that you will want to test parts in this order, your m series coils, igniter itself, or your radiant flame sensor. You may also want to check your regulator just to make sure that part is functioning properly as well. I hope that helps. Good luck with your repair.
6 people found this helpful.
Was this helpful?
Thank you for voting!
Dennis
January 21, 2018
I have a stackable natural gas LG dryer that is not drying the clothes. The lint filter and flexible exhaust hose is clean as well as the exhaust pipe to the roof. An authorized technician replaced the igniter and it is still not drying the clothes. Yes, the gas valve is turned on and there are no blown electrical breakers. What is the real problem?
For model number DLG2526W
Hello Dennis,
Thanks for your question. There are a few different parts you will want to have tested with a multimeter to ensure they have continuity. Replace any that do not have continuity. Test the thermistor, thermostats, the flame sensor, and the temperature sensor.
I hope this helps.
Hello i just change my dryer from lp propane to natural gas and it was working fine before the change. Now it turns on and off and does this over and over. I can see the igniter glow and the gas fire up but shuts off in seconds and cycle over and over. I did test lots of the sensors for continuity and everything i check was good. I also back out the nut on the gas regulator like it said in the instructions when i change the lp propane to natural gas orifice. What else can i do or am i missing to check? It's also free of lint.
For model number DLG2302R
Hello Alberto, thank you for inquiring. For this symptom you will want to replace either the Sensor part PS3529161, the Thermistor part PS3529026, or the Blower Thermostat part PS8747887. We hope this helps.
1 person found this helpful.
Was this helpful?
Thank you for voting!
Kevin
July 10, 2019
I was checking ohms . No reading at all when touching both connections. Does this mean bad part
For model number DLG2051W
Hello Kevin, Thank you for the question. If there is no continuity then it will need to be replaced. Hope this helps!
1 person found this helpful.
Was this helpful?
Thank you for voting!
Guy
August 12, 2019
My dryer turns on won’t fire up gas i do see orange glow from igniter however no ignition or gas smell either every ten to twenty seconds it would glow orange by burner tube but not light everything works no codes otherwise i pulled it apart to check for lint etc and reset button however button didn’t click or do anything so that wasn’t it but the front face by lint trap was over half full of lint i did notice other than that not sure what it could be possibly gas balance or thermal fuse but continuity was weird my multimeter was reading real high then going towards zero and past zero to negative on the thermal fuse and the reset button thingy i really don’t know if i’m using the multimeter right it’s weird also when i turn the dial to continuity or resistance it beeps at me right away without touching anything i think it’s broke too help please thanks
For model number DLG1320W
Hi Guy. thank you for your question. When you are experiencing an issue like this there are a few parts that you will have to test to determine what is causing your issue. For all of these parts you can test them with a multi meter. First you will have to test your thermostats and thermal fuses to make sure they are all functioning correctly. After that you will want to test parts in this order, your m series coils, igniter itself, or your radiant flame sensor. You may also want to check your regulator just to make sure that part is functioning properly as well. Something else you should also check would be your filter and ducts. Make sure there is absolutely no blockage that would restrict air flow in your appliance. We have a video here that will show you how to use a multimeter: https://www.youtube.com/watch?v=bWC44fHn0As. I hope that helps. Good luck with your repair.
1 person found this helpful.
Was this helpful?
Thank you for voting!
Janette
January 30, 2023
My cotton/normal and permanent press cycles are not working properly, the clothes have to be turned on again to get dried. I thought it was the element going out. But now I wonder if it is the thermistors. How would we test them to make sure?
For model number DLEX3370W
Hi Janette,
Thank you for your question. Using a multimeter on the Rx1 setting, touch the probes to the terminals. If you receive a reading of anything other than zero, you need a replacement temperature sensor/thermistor. If you have any questions, please let us know. We look forward to hearing from you!
1 person found this helpful.
Was this helpful?
Thank you for voting!
Michael
January 30, 2023
Dryer still operates but no heat. Will this fix the issue ?
For model number DLE2101W
Hello Michael, thank you for contacting us. Yes, the aforementioned issue can be fixed by replacing the dryer thermistor, part number PS3529026. However, before that, we would recommend checking the heater assembly, part number PS3527790. Please reach out to customer service if you need help placing an order. Glad to be of help!
This part is the replacement high-limit thermostat, or simply the thermostat for your dryer. It is approximately 2 inches wide from tip to tip. The center, rectangular portion of the thermostat is approximately 1 inch in...
Fresh Flow Produce Preserver is made for your refrigerator to help keep produce fresh for longer by absorbing the chemical, ethylene, that causes your fruits and vegetables to ripen quicker. Your produce could be fresh f...
This solid element restorer is for ranges and cooktops. Solid element restorer restores and protects solid elements from rusting and spotting. Follow the instructions on the label when using this product.
This front load washer cleaner removes odor-causing residue. Use it once a month and it will keep your machine fresh and clean. Package comes with 3 tablets.
This low-odor gel, easily cleans away tough burnt-on deposits at room temperature. Apply the gel evenly on the cooled oven surface. Leave the gel to set overnight then wipe away with a clean cloth.
Make your cooktop shine with Frigidaire ReadyClean Glass and Ceramic Cleaner. Our scratch-free, streak-free formula removes smudges, grease, burnt-on food, dirt and oil, while protecting and polishing to repel dust and d...