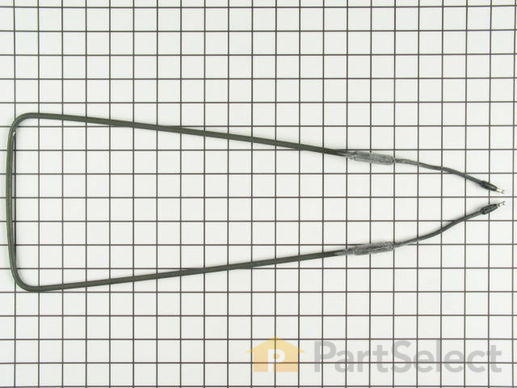
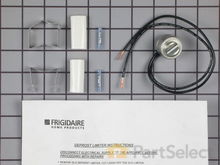
Defrost Heater
$135.37
In Stock
Get this part fast! Average delivery time for in-stock parts via standard shipping: 1.8 days.
PartSelect Number
PS427308
Manufacturer Part Number
218169802
Manufactured by
Frigidaire
Product Description
Defrost Heater Specifications
This part is located at the bottom of the evaporator. The defrost heater heats the evaporator in the defrost mode of operation to keep the cooling coils from frosting over.
How Buying OEM Parts Can Save You Time and Money
Troubleshooting
This part fixes the following symptoms:
Fridge too warm | Freezer not defrosting
This part works with the following products:
Refrigerator.
This part works with the following products:
Frigidaire, Kenmore, Gibson, Uni.
Part# 218169802 replaces these:
AP2114071, 449957, 218169802, 218657302
Customer Repair Stories
Average Repair Rating: 3.2 / 5.0, 9 reviews.
What's this?
- < Prev
- 1
- Next >
Sort by:
Search filter:
Clear Filter
Your search term must have 3 or more characters.
Keep searches simple. Use keywords, e.g. "leaking", "pump", "broken" or "fit".
Sorry, we couldn't find any existing installation instruction that matched.
Fridge evaporator frozen not cooling
First i killed the power and water supply to fridge. Then i removed all the racks in freezer and the 1/4" screws for rack supports with nut driver. Next i removed the evaporator cover 1/4" screws to gain access. Then i removed the the 1/4" screw that holds the evaporator at the bottom and moved the evaporator outward to remove the heater element. Then i installed new heater element from the bottom of the evaporator making sure it was in the center of the evap coils.
Next i replaced the defrost thermostat cutting the old wires. Then stripped and crimpped the new thermostat in place making sure of the same installed postion as removed.
Next i replaced the defrost timer located at the bottom left using philips head screw driver.
Next i replaced the water filter by turning it counterclockwise to remove.
Then restored power and water supply. Next i tested the heater element by turning the dial on the defrost timer clockwise until it clicked and watched the element glow.
Then waited for the deforst thermostat to shut off the heater. Finally i checked the evaporator drain iin the back of fridge for blockage and cleaned out completely.
Repairs successful fridge good as new.
Other Parts Used:
-
Juan from Riverside, CA
-
Difficulty Level:Easy
-
Total Repair Time:15 - 30 mins
-
Tools:Nutdriver, Pliers, Screw drivers, Socket set
118 of 139 people
found this instruction helpful.
Was this instruction helpful to you?
Thank you for voting!
Evaporator coil freezing up, freezer and refrigerator are warm
Danger: Replacing these parts requires working with electrical wiring, be certain to unplug the refrigerator before starting work.
1. Unplug appliance
2. Empty freezer section
3. Remove shelves and Ice storage tray
4. Remove 6 screws from evaporator cover.
Note: Remember where the screws with insulated washers go.
5. Use a hair dryer to melt all ice from coil
Danger: To prevent injury or death from electrocution always ensure that the hairdryer does not get wet while in operation.
6. Unplug defrost heater and defrost thermostat wires
Note: Thermostat is wired in series with the heater.
7. Remove screw from white plastic holder located on top of evaporator coil
8. Remove styrofoam pieces from top of coil
9. Grasp the bottom of the evaporator coil and carefully lift and pull out the bottom end a few inches
10. Remove old heater coil by pulling out from the bottom and replace with new coil
Note: Be very careful when moving the evaporator, it is made of aluminum and will be very costly to repair if you damage the tubing.
11. Replace old thermostat with new thermostat
12. Re-connect thermostat and heater wiring
Note: Remember to route wiring so that condensation does not gravitate to the electrical connections.
13. You can check if the heater is working by manually rotating the defrost timer clockwise. The timer dial is located on the bottom, front of the refrigerator on the freezer side. Be careful, the heater gets very hot.
14. Re-install evaporator cover
15. Re-install shelves and ice storage tray
16. Plug in the refrigerator
Note: Depending on how warm your refrigerator was it may take 24 hours to return to normal operating temperatures.
Note: Take your time and the job will go faster.
Other Parts Used:
-
Neil from Flemington, NJ
-
Difficulty Level:Easy
-
Total Repair Time:1- 2 hours
-
Tools:Nutdriver, Pliers, Screw drivers
43 of 45 people
found this instruction helpful.
Was this instruction helpful to you?
Thank you for voting!
refrigerator side stopped cooling
Noticed no cool air was coming from the vent on the refrigerator side. After cleaning out the freezer side, I noticed that the air intake at the bottom of the freezer was frosted over.I removed the metal panel and discovered the coils were completely frosted over so I found the defrost timer located at the bottom left corner of the refrigerator. took a screwdriver and turned it very slowly to force a defrost. i watched the coils for awhile and noticed that the heat element would never deice. so I thought it may be the thermostat clamped to the top of the coil might be bad. I unplugged the thermostat and plugged the heat element coil directly to wires feeding to the thermostat. On my refrigerator the wire connectors will allow to bypass thermostat. After waiting twenty minutes, I forced another defrost cycle with the timer and noticed the heat element would still not defrost. So i unplugged the heat element and took a test meter and checked the wire connectors and found one twenty volt at the connectors. So, therefore, I determined it must be the heat element itself. Even though they rarely give trouble. I found the service diagram on the back of the refrigerator in a plastic pouch, and it said the ohm resistance should be twenty two. My element read 145 so that also pointed to a bad heat element. I took the screw out that holds the coil in, lifted it about two inches, and pulled the bottom of the coil out just enough to remove the heat element from the coil and discovered it had a crack in it. It must have been a Monday at the factory, because the heat element looked like it had been warped while being installed.I ordered a replacement element and installed it. I works as good as new. I do electrical work for a living, so this was pretty easy for me to figure out.
Other Parts Used:
-
RONDAL from MONROE, NC
-
Difficulty Level:Easy
-
Total Repair Time:30 - 60 mins
-
Tools:Nutdriver
16 of 16 people
found this instruction helpful.
Was this instruction helpful to you?
Thank you for voting!
The freezer coil was frosting up blocking airflow to refrigerator side
I first unplugged the refirgerator. Note the time because the refrigerator should be unplugged at least 30 minutes before plugging back in (see end for why). A trouble light is necessary to see adequately. I removed the shelves and draws and put food in a picnic cooler. I took off the lower panel in the back of the freezer, and defrosted the coils with a hair dryer. I unplugged the wires to the defroster, and then the screw holding the coil to the back of the freezer side. I lifted up on the coil unit to clear the blade that inserts into the drain. I removed the bands on the top of the coil that hold the heating unit in place. I tilted the bottom out when there was clearance, and pulled the defrosting unit down and out. I replaced the new one, and reversed the procedure, and then plugged the wires back into the new defroster unit. The bands on the top should be secured before putting the coil back in place, as well as the foam spacers on top of coil, put the two wires back in the plastic clip that keeps them away from the fan and pipes. Replace lower freezer cover panel and screws. Put shelves and food back in. If at least 30 minutes have passed, plug the refrigerator back in. If you don't wait that long, their will still be pressure in the compressor and it will not start to cool properly right away. It works perfectly now. TIP: check the end of the drain hose periodically by taking off the lower back cover and pull th hose out - not hard to do. Mine plugged from dust and lint build up backing up into the end of the hose so water didn't drain out, and ice built up causing the defroster coil to burn out. I cut a little off the hose so the water level would not rise up into the hose, but the hose would still stay in place in the plastic holder.
Other Parts Used:
-
David from Chetek, WI
-
Difficulty Level:A Bit Difficult
-
Total Repair Time:30 - 60 mins
-
Tools:Nutdriver
11 of 11 people
found this instruction helpful.
Was this instruction helpful to you?
Thank you for voting!
Freezer was freezing up and refrigerator was hot
I turned the refrigerator off and took the screws from the inside back panel of the freezer. Then I took two mounting screws from the evaporator letting it pull out at the bottom a few inches. Then I removed the Defrost Heater and installed the new one. Then I put the mounting screws back in and replaced the Thermostat. Then I put the back panel back on and turned the refrigerator back on. It has been working for now.
Other Parts Used:
-
Debra K from Hornersville, MO
-
Difficulty Level:Really Easy
-
Total Repair Time:15 - 30 mins
-
Tools:Nutdriver
8 of 10 people
found this instruction helpful.
Was this instruction helpful to you?
Thank you for voting!
freezer cold other side for milk warm
the heater defroster was bad. tested and no continuity brake in eliment.just doing a visual might have detected it but it`s hidden behind the coils.....all is working now
Other Parts Used:
-
Thomas J from Dawsonville, GA
-
Difficulty Level:Really Easy
-
Total Repair Time:30 - 60 mins
-
Tools:Nutdriver, Screw drivers, Wrench set
8 of 13 people
found this instruction helpful.
Was this instruction helpful to you?
Thank you for voting!
Refrierator was getting warm
Changed the defrost timer and the Thermostat. Still did not fix the problem. Replaced the defrost heater and now it's cooling just like new.
Other Parts Used:
-
Mark from Statesville, NC
-
Difficulty Level:Really Easy
-
Total Repair Time:30 - 60 mins
-
Tools:Nutdriver, Screw drivers
4 of 6 people
found this instruction helpful.
Was this instruction helpful to you?
Thank you for voting!
the freezer was cold and the refrigerator was not! The eavaportor was icing up was not going thun the defrost cycle!
First I unplugged the appliance for safety,then I proceeded to remove the sheetmetal from inside, the freezer compartment, this is where the evaporator is located and where you will find the defrost limit switch or thermostat same thing. also the defrost heater is located here as well. I made note of what plugged into what and what the colors of the wires are for future use. You also need to check the defrost timer which on this unit, it is located in the very front lower left coner of the appliance. Once I received the parts I put things back together in the reverse order, plugged in the appliance and so far so good the refrigerator is cold now.There are a lot of repair manuels out there that will help you repair your appliances and save yourself a lot of money. You just have to be willing to do it yourself.
Other Parts Used:
-
gregory d from pensacola, FL
-
Difficulty Level:A Bit Difficult
-
Total Repair Time:30 - 60 mins
-
Tools:Nutdriver, Socket set
4 of 6 people
found this instruction helpful.
Was this instruction helpful to you?
Thank you for voting!
Refrigerator. Running all the time freezer cold but refrigerator part not cold.
I took everything out of the freezer. Removed All the shelves, took the front off of the evaporator coil compartment. Then I defrosted the evaporator coils with a blow dryer because they were basically a solid block of ice. Then removed the heater coil, installed a new one. Installed a new defrost thermostat. Put the evaporator coil panel back on. Then I turned the thermostat back up to where the fan came on and I noticed it took a few times for the compressor to continue to run. I don’t know what that was all about but eventually the compressor kicked in and everything worked like it should.
Other Parts Used:
-
Reed from Cash, AR
-
Difficulty Level:A Bit Difficult
-
Total Repair Time:1- 2 hours
-
Tools:Nutdriver, Screw drivers
3 of 3 people
found this instruction helpful.
Was this instruction helpful to you?
Thank you for voting!
- < Prev
- 1
- Next >
Questions and Answers
We're sorry, but our Q&A experts are temporarily unavailable.
Please check back later if you still haven't found the answer you need.
Related Parts
Model Cross Reference
This part works with the following models:
PartSelect Number: PS427308
Manufacturer Part Number: 218169802
Brand
Model Number
Description
Kenmore
25358385893
Refrigerator
- Kenmore Refrigerator Model 253.58385893 (25358385893, 253 58385893) Parts