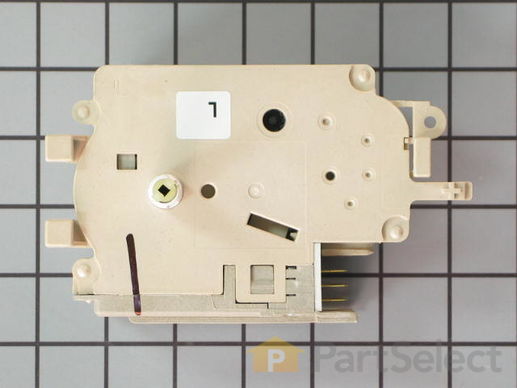
Product Description
Timer Specifications
The timer controls most of the operations of the washer: water level, tub filling and emptying, length of cycles, and cycle setting sequences.
How Buying OEM Parts Can Save You Time and Money
Troubleshooting
This part fixes the following symptoms:
Will not drain
This part works with the following products:
Washer.
This part works with the following products:
Maytag.
Part# WP22003371 replaces these:
AP6006361, 22003371
Customer Reviews
Filter By Rating:
- < Prev
- 1
- Next >
Sort by:
Search filter:
Clear Filter
Your search term must have 3 or more characters.
Keep searches simple. Use keywords, e.g. "leaking", "pump", "broken" or "fit".
Sorry, we couldn't find any existing reviews that matched. Try using some different or simpler keywords.
Roberta F - January 31, 2020
Verified Purchase
Easy Repair
I'm reviewing a Maytag Atlantis timer. Part arrived very quickly, within a week from Ontario to rural Alberta. I would have preferred it be sent by Canada Post, because they are the only carrier that delivers reliably to rural Alberta, but it was sent Purolator (second best choice), which was not as good because the part had to be received by a friend in the closest town and then passed on to me. But it made it. If it had been sent Canada Post it would have got to me directly, even though I have an RR number. But back to the part.... it took only about 10 minutes to install, and it worked perfectly. I am very pleased. FYI I am a senior woman with good mechanical aptitude & this was super easy, the part is well designed for replacement.
Irene R - October 19, 2019
Verified Purchase
Easy as pie to install.
Part arrived like a speeding bullet. Washer goes through all steps without stopping at the final rinse. Couldn't be happier. Thank you..
- < Prev
- 1
- Next >
Customer Repair Stories
Average Repair Rating: 3.2 / 5.0, 6 reviews.
What's this?
- < Prev
- 1
- Next >
Sort by:
Search filter:
Clear Filter
Your search term must have 3 or more characters.
Keep searches simple. Use keywords, e.g. "leaking", "pump", "broken" or "fit".
Sorry, we couldn't find any existing installation instruction that matched.
Couldn't figure out how to remove the dials
After of hours on the internet looking for answers ( Without any success ) I accidently came upon the solution. There's a small hidden cover plate on the front of the knob that just looks cosmetic. If you slip a knife under it it pops off then the rest is a piece of cake. Maytag had no info on their web site and lots of other inaccurate info is posted on the web.
Other Parts Used:
-
Robert from Jupiter, FL
-
Difficulty Level:Very Difficult
-
Total Repair Time:Less than 15 mins
-
Tools:Nutdriver, Screw drivers
28 of 29 people
found this instruction helpful.
Was this instruction helpful to you?
Thank you for voting!
Washer completely stopped and would not run.
My timer was not working properly, it had to be turned to start each cycle and it would not move to the rinse cycle after the wash cycle - but it did run. I did not want to put out $70 or $80 bucks if I could make it work - but then it completely stopped. (The washer got off balance due to the load and would not run, after bouncing around on the floor.) The washer was getting power, since the pump would work and it would fill with water - but would not start the wash cycle. I ordered a new timer and put it in, which was pretty easy. First you unplug the unit, you don't want to get a shock. There are three screws on the back of the control panel that are removed with a phillips head screwdriver. The panel is then leaned/titled forward and the four plastic fins pull out of the slots, make sure you tilt it forward as you remove it and do not break off the fins/pins. Unplug the old timer and remove one nut holding it down. In order to remove the timer you have to remove the knob on the front. To do this you have to pull the small cosmetic cover off of the front of the knob - which you can pop off with a small screwdirver - it is in the very center of the knob. Once the small cover is off there is a small clip, pull it out and the knob will come off easily. Pull the timer out of the back of the control panel and put the new timer back in, plug in the timer and put the nut back on to hold it. Replace the knob, clip and cover on the front. Push the fins/pins back into the holes, replace the screws and you should be ready to go once you plug it back in. In my case it still would not run and my problem ended up being the lid switch. I figured this out by holding the button down with a pair of pliers and the washer started. I knew then that the switch needed to be adjusted. When the machine got off balance, the bouncing caused the lid switch to get out of place. I had to remove the control panel again and the lid, which is held on by two clips, that are easy to remove (only need to remove one), carefully put a small screw dirver under the clip and lift it up, then pop it off. You can then adjust the button, which has two parts, the switch and the push rod. This was the hardest part of the repair. The switch is not really put in well, looks like it should pop in to the slot, but would not allow the swith and push rod to work together. It sits on top of the opening. It took several tries to finally get it back right and adjusted with the push rod in the right place, but once I got it adjusted, replaced the lid, put the control panel back, plugged it in - it ran like a top. The new timer runs until the cycle is complete.
Other Parts Used:
-
Alan from Carrollton, GA
-
Difficulty Level:Easy
-
Total Repair Time:30 - 60 mins
-
Tools:Nutdriver, Screw drivers
13 of 13 people
found this instruction helpful.
Was this instruction helpful to you?
Thank you for voting!
Washer would stop running during the wash cycle
1, Unplug unit from power outlet. 2, Removed 3 screws on the top back control console, 3, pushed bottom section back (standing in front) and tip top section foward, console then will lay flat on top of the washer, 4, remove wire connector, 5, remove 1/4 " screw lower left side, 6, lift locking tap up and slide timer to the left. 7, Set new timer in place and reverse the procedure starting with step 6.
Other Parts Used:
-
David from Mentor, OH
-
Difficulty Level:Really Easy
-
Total Repair Time:15 - 30 mins
-
Tools:Nutdriver, Screw drivers
11 of 13 people
found this instruction helpful.
Was this instruction helpful to you?
Thank you for voting!
Washer would not advance through the cycles.
Removed three screws on top of the control area. Removed the round rubber ring and pried the cap off the timer knob, removed the round plastic center and the knob. Removed the timer wire harness and removed old timer. Reversed the steps with new unit.
Other Parts Used:
-
stuart from harbor city, CA
-
Difficulty Level:Really Easy
-
Total Repair Time:15 - 30 mins
-
Tools:Screw drivers
7 of 9 people
found this instruction helpful.
Was this instruction helpful to you?
Thank you for voting!
Wash on one cycle, would not spin
I ordered timer from another supplier. Remove back control panel. Pull knob off timer. Unplug wire harness. replace timer, still didn't work. I replaced the control board and lid switch both very easy to do but to no avail. The motor would just hum so I removed the front panel and replaced the motor which was easy also. No luck. I therefore called PartsSelect.com and ordered a timer from them and VOILA!! All working great. After all that, it was indeed the timer and the "new" one I got from another online supplier was bad that they sent me.
Other Parts Used:
-
Gary from Lock Haven, PA
-
Difficulty Level:A Bit Difficult
-
Total Repair Time:More than 2 hours
-
Tools:Nutdriver, Pliers, Screw drivers
5 of 7 people
found this instruction helpful.
Was this instruction helpful to you?
Thank you for voting!
spin ok.lock up went washing
put the timer work. but lockup washing
Other Parts Used:
-
william from palm coast, FL
-
Difficulty Level:Really Easy
-
Total Repair Time:Less than 15 mins
-
Tools:Screw drivers
3 of 6 people
found this instruction helpful.
Was this instruction helpful to you?
Thank you for voting!
- < Prev
- 1
- Next >
Questions and Answers
We're sorry, but our Q&A experts are temporarily unavailable.
Please check back later if you still haven't found the answer you need.
Related Parts
Model Cross Reference
This part works with the following models:
PartSelect Number: PS11739434
Manufacturer Part Number: WP22003371
Brand
Model Number
Description