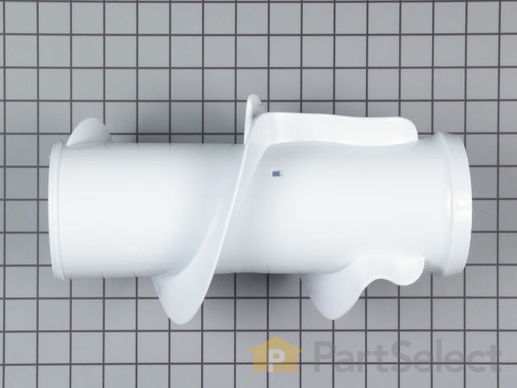
Part Location Diagram of WP3348752 Whirlpool Upper Agitator
See part 10 in the diagram
( Grid squares measure 1x1 inch )
Customer Service Representative

Get in touch, we're here to help!

Monday to Saturday
8am - 9pm EST

customerservice@partselect.ca

Upper Agitator

$158.33
  Special Order
PartSelect Number PS11741159
Manufacturer Part Number WP3348752
Manufactured by Whirlpool
Product Description

Upper Agitator Specifications

This white clothes mover is designed for the upper portion of the agitator.
How Buying OEM Parts Can Save You Time and Money

How Buying OEM Parts Can Save You Time and Money

Troubleshooting
This part fixes the following symptoms:
Will not agitate
This part works with the following products:
Washer.
This part works with the following products:
Whirlpool, Roper, Estate, KitchenAid.
Part# WP3348752 replaces these:
3347233, 3348752, 3348916, 3352109
Back to Top
Customer Repair Stories
 Average Repair Rating: 4.0 / 5.0, 14 reviews. What's this?
  • 1
  • 2
Sort by:
Sorry, we couldn't find any existing installation instruction that matched.
Clothes mover stopped working. Found, after disassembly, that cam dogs were broken into many pieces.
I first pulled the softener dispenser cap off, then re-moved the inner cap/seal by twisting and pulling (it was a little stubborn, but alternating my grip from side to side while pulling was helpful). Using a 7/16" socket with an extension to reach down inside the mover, I then loosened the agitator mounting bolt. Note the amount of torque needed to "break " the bolt from the threads holding it as you don't want to overtighten it when you replace it. It doesn't require much effort to tighten it., depend-ing on the size of your wrench. I then lifted the agitator up and off its shaft by slipping my fingers under it on opposite sides of its base. Then, I lifted the mover or auger off the agitator and removed the thrust washer, cam and cam dogs. Don't worry; the illustrated instructions which are included with the new parts are quite clear and understandable. Then, I placed the new thrust washer and cam and dogs (a separate instruction sheet shows you how to assemble the cam, dogs and bearing; not difficult). Here's the only complaint I have about all this: the instructions advise you to apply agitator grease to the top surface of the thrust washer, but the grease isn't included in the kit. I used standard plumber's silicone grease which I had on hand. Hopefully, that won't be a problem. There's a part # for the grease shown on the illustration (#350849).
It would be helpful if this information were given when ordering these replacement parts. You then put the auger and cam on the agitator and place the assembly back on the shaft in the wash tub and replace the mounting bolt and tighten it. Remember to not overtighten it. Then you place the inner cap/seal back inside the mover after lubricating the seal with plumber's grease or liquid soap and replace the dispenser cap. The instructions remind you that the mover is to turn only clockwise and, if that's what you have, you are finished. As a precaution, I checked the "play" (and there is some in it) in the mover/auger after assembly then checked it again after the first couple of loads we washed. It seems to be fine.
Please don't let the length of this story alarm or discourage you. I'm trying to include everything which might be helpful to anyone who wants to do this. It really isn't difficult. Incidentally, it probably wasn't necessary to replace the mover/auger in my machine as it looked to be in very good condition, but I thought it wise (at another's suggestion) to replace it in case it might wear the other parts prematurely. I hope this helps somebody out there and that I didn't forget anything. Again, the parts come with very good instructions. Just don't forget the grease!
Other Parts Used:
Agitator Repair Kit
  • Claude from Beckley, WV
  • Difficulty Level:
    Easy
  • Total Repair Time:
    30 - 60 mins
  • Tools:
    Socket set
392 of 409 people found this instruction helpful.
Was this instruction helpful to you?
Thank you for voting!
Agitator auger failed to move properly
Piece of cake. Pulled the single retainer bolt from inside the auger. A slight tug up and the entire auger agitator assembly was out. Then I disassembled the guts of the agitator cam and cleaned it up. Following the directions that were in the replacement packages. (very good instructions in plain English, finally ! ) I replaced the damaged "dogs" and reversed the install process. It works like a dream and my 87 year old mother couldn't be happier. Nick Kackloudis
Other Parts Used:
Agitator Repair Kit
  • Nick S. from Cleveland, OH
  • Difficulty Level:
    Really Easy
  • Total Repair Time:
    15 - 30 mins
  • Tools:
    Socket set
49 of 1314 people found this instruction helpful.
Was this instruction helpful to you?
Thank you for voting!
Upper Agitator & cogs wore out
I pulled the cap and took a socket wrench turned the stud agit off and removed the upper agitator. Than I assembled the new agitator with the new clogs put the agaiator back on and tightened the stud agit. Replaced new cap and done! Easy job!! Everything is working like new again. This whirlpool washer is 14 years old and still going strong!
Other Parts Used:
Agitator Cap Barrier with Seal Seal, Inner Cap Agitator Directional Cogs Agitator Bolt O-Ring Agitator Cap
  • Thomas from Troy, MI
  • Difficulty Level:
    Really Easy
  • Total Repair Time:
    Less than 15 mins
  • Tools:
    Socket set
16 of 26 people found this instruction helpful.
Was this instruction helpful to you?
Thank you for voting!
Washing Machine Agitator not moving much
First take Fabric Softener Dispenser and cap off Agitator, locate nut, unscrew and wiggle up and out. Agitator Repair Kit comes with the cam dogs and assembly that you put together. (They will only fit one way) I opted to get the Upper Agitator as well since the old one had frayed edges. It is easier to turn over the Upper Agitator and place the assembled Repair Kit inside it then turn over and replace in original position. Using old nut, screw to the lower agitator. Replace cap and Fabric Softener Dispenser.
Other Parts Used:
Dual Inlet Water Valve Fabric Softener Dispenser Agitator Repair Kit
  • Alex from Madisonville, KY
  • Difficulty Level:
    Really Easy
  • Total Repair Time:
    15 - 30 mins
  • Tools:
    Socket set
9 of 14 people found this instruction helpful.
Was this instruction helpful to you?
Thank you for voting!
Not spinning clothes at top of load
I removed dispenser for softener, then pulled cap inside upper agitator, I was able to get my fingers in the grips and pull firmly to unseat it. (disgard o-ring it comes with the repair kit). I then removed the bolt from center and grabbed the bottom of the lower agitator and gave it a good tug to release the whole unit. If that don't work you can get a flat tip screwdriver between the two sections and pry up slightly. Once it was all loose I removed the upper assembly taking care to to remember how all the pieces were assembled. replaced everything in the same order and when it came time to reinstall the inner cap and seal I made sure I put the cap in straight. Also if the seal doesn't cooperate you can use a little liquid soap to lubricate it. you dont want to use grease because it could possibly get on the clothes (the softener sits in there)! You can use the tip of the screwdriver to tuck the oring in if that doesn't work but be very careful
Other Parts Used:
Seal, Inner Cap Agitator Repair Kit
  • William from Nashua, NH
  • Difficulty Level:
    Really Easy
  • Total Repair Time:
    15 - 30 mins
  • Tools:
    Socket set
6 of 8 people found this instruction helpful.
Was this instruction helpful to you?
Thank you for voting!
top agitator worn out
Ordered parts 3pm thursday, came in 10 am friday.
removed 1 7/16 bolt, installed new drive and agitatir, re-installed bolt and was done. about 10 minutes. took longer to find the socket than to fix the machine. thanks for the fast shipping of the right part the first time.
Other Parts Used:
Agitator Repair Kit
  • Mark from Pembroke, MA
  • Difficulty Level:
    Really Easy
  • Total Repair Time:
    Less than 15 mins
  • Tools:
    Socket set
4 of 4 people found this instruction helpful.
Was this instruction helpful to you?
Thank you for voting!
The Washer wasn't agitating.
Removed the attaching bolt and then removed the Upper Agitator Assembly. I removed the damaged parts and installed the Agitator Repair Kit and Re-installed the NEW Upper Agitator Assembly.

All of our wash was smelling like mildew. It was making us nauseas . After the repair everything smelled fresh and clean again. We received our parts within three days.

Thanks
Other Parts Used:
Agitator Repair Kit
  • Al from Lake Tapps, WA
  • Difficulty Level:
    Really Easy
  • Total Repair Time:
    15 - 30 mins
  • Tools:
    Nutdriver
3 of 4 people found this instruction helpful.
Was this instruction helpful to you?
Thank you for voting!
Agitator wouldn't twirl.
Removed old agitator and determined teeth in center were worn down. Purchased new upper agitator assembly and repair kit. It now works like a new washer. (NOTE: It wasn't until after I did the repair that I heard 15 years is quite old for a washer. But it cost me $40 to repair compared to $500 to replace. I hope it lasts another 15 years!)
Other Parts Used:
Agitator Repair Kit
  • Sandra from Hartford, NY
  • Difficulty Level:
    A Bit Difficult
  • Total Repair Time:
    1- 2 hours
  • Tools:
    Screw drivers, Wrench (Adjustable)
3 of 5 people found this instruction helpful.
Was this instruction helpful to you?
Thank you for voting!
Top of the agitator wasn't spinning.
I simply removed the bolt from the inside of the agitator and pull the whole the straight up. It came aloose pretty easily. I took the old clothes mover off and put the new one on. On the inside of the mover the dog ears and spacer easily comes out. I removed the spacer and replaced the dogs ears. I put everything back together the way it was when I took it apart. It works as good as it did when I first got it.
Other Parts Used:
Agitator Directional Cogs
  • April from Lufkin, TX
  • Difficulty Level:
    Really Easy
  • Total Repair Time:
    15 - 30 mins
  • Tools:
    Socket set
2 of 2 people found this instruction helpful.
Was this instruction helpful to you?
Thank you for voting!
Upper agitatator spining
Removed the softner despenser; removed the bolt that support the upper agitator, pull it out. Change the dogs cam and put everything back . real simple.
Other Parts Used:
Agitator Cam Kit
  • Jorge from Pensaola, FL
  • Difficulty Level:
    Easy
  • Total Repair Time:
    Less than 15 mins
  • Tools:
    Socket set
2 of 2 people found this instruction helpful.
Was this instruction helpful to you?
Thank you for voting!
  • 1
  • 2
Questions and Answers

We're sorry, but our Q&A experts are temporarily unavailable.
Please check back later if you still haven't found the answer you need.

Related Parts
Model Cross Reference
This part works with the following models:
PartSelect Number: PS11741159
Manufacturer Part Number: WP3348752
Brand
Model Number
Description
Whirlpool
1CLSR7010PQ0
Washer - Residential
Whirlpool
1CLSR7010PQ1
Washer - Residential
Whirlpool
1CLSR7333PQ0
Washer - Residential
Whirlpool
1CLSR7333PQ1
Washer - Residential
Whirlpool
1CLSR9434PQ0
Washer - Residential
Whirlpool
1CLSR9434PQ1
Washer - Residential
Whirlpool
1CLSR9434PT0
Washer - Residential
Whirlpool
1CLSR9434PT1
Washer - Residential
Whirlpool
1CWTW4845EW0
Washer - WASHER
Whirlpool
1CWTW4845EW1
Washer - WASHER
Whirlpool
1CWTW5100VQ0
Washer - Residential
Whirlpool
1CWTW5100VQ1
Washer - Residential, Automatic
Whirlpool
1CWTW5300SQ0
Washer - Residential
Whirlpool
1CWTW5590SQ0
Washer - Residential
Whirlpool
1CWTW5590ST0
Washer - Residential
Whirlpool
1CWTW5590VQ0
Washer - Residential
Whirlpool
1CWTW5590VQ1
Washer - Residential
Whirlpool
1CWTW5790SQ0
Washer - Residential
Whirlpool
1CWTW5790ST0
Washer - Residential
Whirlpool
2DWTW4845EW0
Washer - WASHER
Whirlpool
2DWTW4845EW1
Washer - WASHER
Whirlpool
2LSR5233BN0
Washer - Residential, Automatic
Whirlpool
2LSR5233BQ1
Washer - Residential, Automatic
Whirlpool
2LSR5233BQ2
Washer - Residential, Direct Drive
Whirlpool
2LSR5233BW0
Washer - Residential, Automatic
Whirlpool
2LSR5233BZ1
Washer - Residential, Automatic
Whirlpool
2LSR5233BZ2
Washer - Residential, Direct Drive
Whirlpool
3CAP2762BN0
Washer - Commercial, Automatic
Whirlpool
3CAP2762BW0
Washer - Commercial, Automatic
Whirlpool
3CAP2782BN0
Washer - Commercial
Customer Service Representative

Get in touch, we're here to help!

Monday to Saturday
8am - 9pm EST

Contact Customer Service