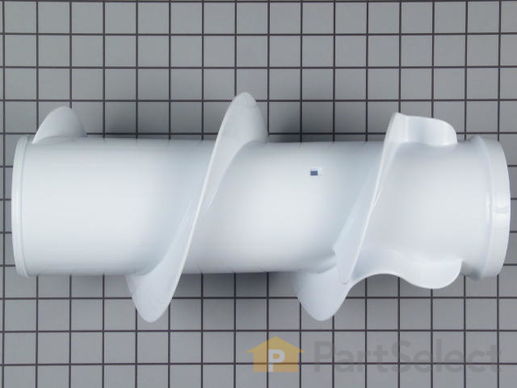
Part Location Diagram of WP3349019 Whirlpool Upper Agitator
See part 10 in the diagram
( Grid squares measure 1x1 inch )
Customer Service Representative

Get in touch, we're here to help!

Monday to Saturday
8am - 9pm EST

customerservice@partselect.ca

Upper Agitator

$194.78
  Special Order
PartSelect Number PS11741161
Manufacturer Part Number WP3349019
Manufactured by Whirlpool
Troubleshooting
This part fixes the following symptoms:
Will not agitate
This part works with the following products:
Washer.
This part works with the following products:
Whirlpool, Maytag, Roper, Estate.
Part# WP3349019 replaces these:
3349019, 3352113, 3357527
Back to Top
Customer Repair Stories
 Average Repair Rating: 4.5 / 5.0, 10 reviews. What's this?
  • 1
Sort by:
Sorry, we couldn't find any existing installation instruction that matched.
upper agitator not turning
removed agitator top by pulling up with hands. Removed inner agitator seal body by grasping with pliers and pulling up. Used 7/16 socket with extra extension to remove top agitator retension bolt. Removed top agitator body and thrust spacer by lifting off of agitator base. Assembled dogs on body as shown in instructions. Replaced thrust spacer on top of agitator base. Installed upper agitator body. Placed dog body inside upper agitator. Placed small piece of paper over 7/16 socket and forced bolt into socket. This held bolt in upright position as I replaced it down inside the upper agitator body and dog assembly with the long extensions. Replaced O-ring on inner agitator seal body and replaced into the upper agitator body using the long extensions to tap it into place. Pressed top agitator cap onto top of upper agitator body. All done. The agitator repair kit purchased had a thrust spacer in it but was not the correct one for my model so I purchased the correct spacer separate. The website is great because it shows the parts in detail so you can take your time and get the proper parts first time, everytime.
Other Parts Used:
Agitator Repair Kit Thrust Spacer
  • Eddie from Lovington, NM
  • Difficulty Level:
    Really Easy
  • Total Repair Time:
    Less than 15 mins
  • Tools:
    Pliers, Socket set
52 of 1086 people found this instruction helpful.
Was this instruction helpful to you?
Thank you for voting!
Cloths mover was worn out
1st removed the cap, then took nut drive/ long socket and removed the agitator nut. Pulled up and removed the agitator / cloths mover. With a gentle pull and twist the cloths mover separated from the agitator. The old dog assembly fell out in the process. Installed new dog kit in agitator and put new cloths mover on the agitator. Put back in machine and tightened nut. Your web site is great . Easy to navigate and understand. Parts shipped same day and were at my house the next day. Great Prices and also found the live chat useful. Will sure to use again.
For this repair I do recommend replacing both the dogs and the cloths mover as the slots in the cloths mover do wear.
Other Parts Used:
Agitator Repair Kit
  • Mark from Long Valley, NJ
  • Difficulty Level:
    Easy
  • Total Repair Time:
    15 - 30 mins
  • Tools:
    Nutdriver
46 of 48 people found this instruction helpful.
Was this instruction helpful to you?
Thank you for voting!
Upper agitator wore out
Pull the cap off of the top of the agitator.
Pull the plastic peice that is inside of the agitator up.
Use a deep well socket with an extension and remove the nut.
Pull the agitor off.
Follow the installation instructions that come with the part.

I saved $40 on the cost of the parts and the price to repair, which would probably cost about the same as the part I would have picked up at the local supplier. ~$90.

This is the first time I used the site. Two thumbs up. The price is right and the delivery is fast.
Other Parts Used:
Agitator Repair Kit
  • Caven from Richmond, KY
  • Difficulty Level:
    Really Easy
  • Total Repair Time:
    Less than 15 mins
  • Tools:
    Socket set
20 of 20 people found this instruction helpful.
Was this instruction helpful to you?
Thank you for voting!
Top portion of agitator wouldn't turn.
First I removed the top cap on the agitator, then I removed the second cap inside the agitator. I moved the agitator with my hands and saw that the "dog ears" were worn and no longer touched the agitator and couldn't move it. I then used a nut driver to remove the nut that held the top portion of the agitator onto the bottom portion. I made a note of the worn parts, got online at PartsSelect.com and ordered the replacement parts. A few days later the parts arrived and I repeated the above process in reverse using the new parts. It now works like new!!! It wasn was very easy. Thanks!!!
Other Parts Used:
Agitator Cap Barrier with Seal Agitator Cap Agitator Repair Kit
  • Michael from El Segundo, CA
  • Difficulty Level:
    Really Easy
  • Total Repair Time:
    Less than 15 mins
  • Tools:
    Nutdriver
5 of 7 people found this instruction helpful.
Was this instruction helpful to you?
Thank you for voting!
Replacement of upper agitator.
Very simple. Remove the fabric softener dispenser. Then remove the nut that is inside the agitator (requires a couple of extensions for your socket set). Remove the agitator by pulling up.

I replaced the 'dog ears' or agitator and the upper agitator. It is easy to see where everything needs to go after you take it apart. The upper agitator had plastic gears that were stripped and wouldn't have worked by only replacing the directional cogs.

Its easy, nothing to worry about.
Other Parts Used:
Agitator Directional Cogs
  • Joshua from Lincoln, NE
  • Difficulty Level:
    Easy
  • Total Repair Time:
    15 - 30 mins
  • Tools:
    Pliers, Socket set
4 of 6 people found this instruction helpful.
Was this instruction helpful to you?
Thank you for voting!
agitator would not
took off bolt holding agitator on... replaced parts..put back on
Other Parts Used:
Agitator Directional Cogs Thrust Spacer
  • danny from WASHINGTON, NC
  • Difficulty Level:
    Really Easy
  • Total Repair Time:
    15 - 30 mins
  • Tools:
    Socket set
2 of 2 people found this instruction helpful.
Was this instruction helpful to you?
Thank you for voting!
Washing machine would not agitate.
I used a socket wrench to remove the bolt holding the agitator assembly together. Removed the assembly and replaced Upper Agitator, Agitator Agitator Repair Kit with new parts using the instructions enclosed. I did purchase extra Agitator Directional Cogs and a thrust spacer to have as spare. It was so easy a caveman can do it ;)
Other Parts Used:
Agitator Directional Cogs Agitator Repair Kit Thrust Spacer
  • XAVIER from RIO RICO, AZ
  • Difficulty Level:
    Really Easy
  • Total Repair Time:
    15 - 30 mins
  • Tools:
    Socket set
2 of 3 people found this instruction helpful.
Was this instruction helpful to you?
Thank you for voting!
all went well. all parts were perfect
remove top with screwdriver. used coat hanger to remove upper seal and cap. removed screw with nutdriver and extension and rachet. installed new parts and reversed procedure. Partselect.com is great.
Other Parts Used:
Agitator Repair Kit Thrust Spacer
  • James from Oxford, MS
  • Difficulty Level:
    Really Easy
  • Total Repair Time:
    Less than 15 mins
  • Tools:
    Nutdriver
1 person found this instruction helpful.
Was this instruction helpful to you?
Thank you for voting!
this unit was not agitating
I removed the center bolt that holds it in place.Removed the old agitating unit and installed the new parts. Very simple.I was more then happy with the ordering and repairing.I will deffinetly use this system again
Other Parts Used:
Seal, Inner Cap Agitator Bolt Agitator Repair Kit Thrust Spacer
  • Randy from Mills, WY
  • Difficulty Level:
    Really Easy
  • Total Repair Time:
    15 - 30 mins
  • Tools:
    Socket set
1 of 2 people found this instruction helpful.
Was this instruction helpful to you?
Thank you for voting!
Upper Agitator not working properly, noisey.
Bottom Agitator was working, but top part wasn't. It was running ok, but not cycling the clothes from top to bottom.
The repair was fairly simple. I took the cap off the center, and down inside was a domed looking disk with an O ring on it. I turned it a little to unseat it, and it came right out. I used a Socket wrench with an 11mm socket and multiple extentions to reach down to the bolt. When I took out the bolt, the whole thing comes out. I got the top agitator piece, it needed one. the repair kit, it needed this also. And a thrust washer that I did not need. The kit came with a thrust washer, and I didn't know it. The washer only cost $2 and something, so I didn't worry about it to much. Had all the instruction, with pic's, so it was no problem to replace. Anyone with a little mechanical know-how will breeze through it.
Other Parts Used:
Agitator Repair Kit Thrust Spacer
  • Jack from Dallas, TX
  • Difficulty Level:
    Easy
  • Total Repair Time:
    15 - 30 mins
  • Tools:
    Screw drivers, Socket set
1 of 4 people found this instruction helpful.
Was this instruction helpful to you?
Thank you for voting!
  • 1
Questions and Answers

We're sorry, but our Q&A experts are temporarily unavailable.
Please check back later if you still haven't found the answer you need.

Related Parts
Model Cross Reference
This part works with the following models:
PartSelect Number: PS11741161
Manufacturer Part Number: WP3349019
Brand
Model Number
Description
Whirlpool
1CLXR7244PT0
Washer - Residential
Whirlpool
1CLXR7244PT1
Washer - Residential
Whirlpool
2DLXR7244MQ0
Washer - Residential
Whirlpool
2DLXR7244MQ1
Washer - Residential
Whirlpool
2DLXR7244MQ2
Washer - Residential
Whirlpool
2DLXR7244MQ3
Washer - Residential
Maytag
2DMTW5705TW0
Washer - Residential
Maytag
2DMTW5705TW1
Washer - RESIDENTIAL WASHER
Whirlpool
2DWTW5305SQ0
Washer - Residential
Whirlpool
3LBR5132AN0
Washer
Whirlpool
3LBR5132AW0
Washer
Whirlpool
3LBR5132BW0
Washer
Whirlpool
3LBR5132BW1
Washer
Whirlpool
3LBR6132EQ0
Washer
Whirlpool
3LBR6132EQ1
Washer
Whirlpool
3LBR7132DW0
Washer
Whirlpool
3LBR7255AN0
Washer
Whirlpool
3LBR7255AQ0
Washer
Whirlpool
3LBR7255BQ0
Washer
Whirlpool
3LBR7255BQ1
Washer
Whirlpool
3LBR8255DQ0
Washer
Whirlpool
3LBR8255EQ0
Washer
Whirlpool
3LBR8255EQ1
Washer
Whirlpool
3RLBR8543JQ1
Washer - Residential
Whirlpool
3RLBR8543JQ2
Washer - Residential
Whirlpool
3RLBR8543JQ3
Washer - Residential
Maytag
3UMTW5755TW0
Washer - Residential
Maytag
3UMTW5755TW1
Washer - AUTOMATIC WASHER
Whirlpool
3XLBR5432JQ1
Washer - Residential
Whirlpool
3XLBR5432JQ2
Washer - Residential
Customer Service Representative

Get in touch, we're here to help!

Monday to Saturday
8am - 9pm EST

Contact Customer Service