Product Description
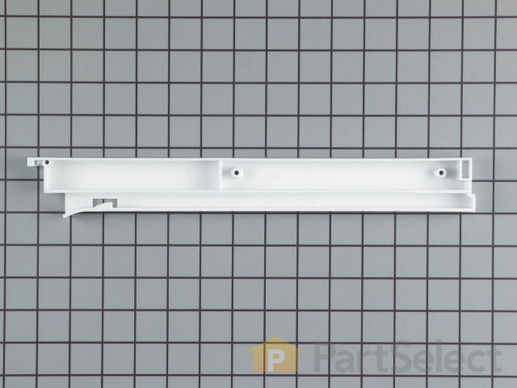
Meat Drawer Hanging Rail - Left Side Specifications
The drawer track supports the left hand side of the sliding drawer.
How Buying OEM Parts Can Save You Time and Money
Troubleshooting
This part works with the following products:
Refrigerator.
This part works with the following products:
Frigidaire, Kenmore, Gibson, Tappan.
Part# 218971202 replaces these:
AP2115569, 781255, 5303298718, 5304404462
Customer Reviews
Filter By Rating:
- < Prev
- 1
- Next >
Sort by:
Search filter:
Clear Filter
Your search term must have 3 or more characters.
Keep searches simple. Use keywords, e.g. "leaking", "pump", "broken" or "fit".
Sorry, we couldn't find any existing reviews that matched. Try using some different or simpler keywords.
Gordon F. B - May 1, 2019
Verified Purchase
correct parts, simple install
perfect replacement
- < Prev
- 1
- Next >
Customer Repair Stories
Average Repair Rating: 4.6 / 5.0, 8 reviews.
What's this?
- < Prev
- 1
- Next >
Sort by:
Search filter:
Clear Filter
Your search term must have 3 or more characters.
Keep searches simple. Use keywords, e.g. "leaking", "pump", "broken" or "fit".
Sorry, we couldn't find any existing installation instruction that matched.
The hanging rails & meat pan runners were broken
1) The meat drawer and rails were damaged when my 7-year old son closed the refrigerator door while the meat pan was still extended.
2) I ordered the parts on-line using your easy to follow part search.
3) The items arrived 3 days later.
4) I used a phillips screw driver to remove the old rails & I attached the new rails (approximately 10 minutes).
5) I slid the front cover off of the damaged meat pan and slid it on to the new meat pan (approximately 3 minutes).
6) I slid the new meat pan onto the new rails.
7) I demonstrated to my son the importance of closing the meat pan prior to shutting the refrigerator door.
Other Parts Used:
-
Brad from Kent, OH
-
Difficulty Level:Really Easy
-
Total Repair Time:15 - 30 mins
-
Tools:Screw drivers
20 of 22 people
found this instruction helpful.
Was this instruction helpful to you?
Thank you for voting!
broken deli drawer and gasket distended and out of place at corner
My husband and I were online pricing new refrigerators ($1100 and up plus an otherwise okay frig to add to the landfill). I had a moment of clarity and tried a parts search and found this site. I decided we were NOT going to replace it, we would fix it.
I pulled out the entire shelf and unscrewed the rail. I manuevered in the new rail and screwed it down. I returned the shelf and now I no longer have the deli drawer drop out of the tracks.
To replace the gasket, the worse part was having to empty the contents of the door and removed all of the 30+ screws that hold it in place. I positioned the gasket over the edge of the door inset, pressed it back up against the door with the gasket in place, lined up the screw holes and started turning the screwdriver. I screwed in the top 2 corners first so they would hold the door inset in place from that point.
The instructions stated that silicon sealant should be applied between the gasket and the door, particularly at the corners, and I did this, particularly since the corner pulling out was why I was replacing the gasket in the first place.
However after I returned all the screws to the proper place and turn the refrigerator back on, I noticed condensation around the seal. I realized after a few days that I had silicon on the gasket itself and this was causing an imperfect seal. I cleaned all the little wisps of silicon off the gasket and the frig has been fine ever since.
Other Parts Used:
-
Pamela from Severna Park, MD
-
Difficulty Level:A Bit Difficult
-
Total Repair Time:30 - 60 mins
-
Tools:Screw drivers
10 of 13 people
found this instruction helpful.
Was this instruction helpful to you?
Thank you for voting!
broken hanger
unscrew the hangers and replaced with the new ones. The parts were delivered in 24 hrs..amazing!
Other Parts Used:
-
ed from carlsbad, CA
-
Difficulty Level:Really Easy
-
Total Repair Time:Less than 15 mins
-
Tools:Screw drivers
5 of 5 people
found this instruction helpful.
Was this instruction helpful to you?
Thank you for voting!
Both sides of the meat drawer hanging rails had been broken, and the drawer kept falling out.
First, I removed the shelf holding the meat drawer . Next, I used a screwdriver to remove the 4 screws that held the old rails to the shelf. Finally, I positioned the new rails and reinserted the screws into the holes and tightened. Less than 10 minutes and super easy!
Other Parts Used:
-
Linda from Colchester, CT
-
Difficulty Level:Really Easy
-
Total Repair Time:Less than 15 mins
-
Tools:Screw drivers
5 of 7 people
found this instruction helpful.
Was this instruction helpful to you?
Thank you for voting!
broken plastic pieces
I just replaced the broken plastic pieces that I got from PartSelect. It was great and fast.
Other Parts Used:
-
Douglas from Clearwater, FL
-
Difficulty Level:Really Easy
-
Total Repair Time:Less than 15 mins
5 of 9 people
found this instruction helpful.
Was this instruction helpful to you?
Thank you for voting!
the drawer was broken because of carelessness
I followed the directions, which were very simple and easy to follow. The whole process was easy and fast. Couldn't be happier.
Other Parts Used:
-
Christina from Newtown Square, PA
-
Difficulty Level:Really Easy
-
Total Repair Time:Less than 15 mins
-
Tools:Screw drivers
2 of 2 people
found this instruction helpful.
Was this instruction helpful to you?
Thank you for voting!
Broken hanging rail for drawer in refrigerater
First I removed 2 screws and removed broken railing then placed new railing ad screwed in new screws then replaced drawer into railings. Thank you so much for the excellent service in geting me the correct part in a timely manner.
Other Parts Used:
-
David from Lynchburg, VA
-
Difficulty Level:Really Easy
-
Total Repair Time:Less than 15 mins
-
Tools:Screw drivers
2 of 3 people
found this instruction helpful.
Was this instruction helpful to you?
Thank you for voting!
Plastic rail broke.
The meat drawer is already pulled out because the broken rail could not support it. 1st I removed the shelf. Then I removed the 2 screws connecting the rail to the shelf. I then replaced the rail, screwed it together and put the shelf back in place. I put the meat drawer back on the rails and it's done.
Other Parts Used:
-
RODNEY from NEW YORK, NY
-
Difficulty Level:Really Easy
-
Total Repair Time:Less than 15 mins
-
Tools:Screw drivers
1 person
found this instruction helpful.
Was this instruction helpful to you?
Thank you for voting!
- < Prev
- 1
- Next >
Questions and Answers
We're sorry, but our Q&A experts are temporarily unavailable.
Please check back later if you still haven't found the answer you need.
Related Parts
Model Cross Reference
This part works with the following models:
PartSelect Number: PS429410
Manufacturer Part Number: 218971202
Brand
Model Number
Description